
Setting Up Local Inventory Ads (and Free Local Ads) on Google - A Comprehensive Guide
Something I’ve been working on frequently recently is setting up local inventory ads for clients via Google Merchant Center - for both single and multiple physical stores. This is an area that isn’t particularly well documented across the web so I’m hoping to remedy this with a step by step guide on how to get this set up with ease.
For this run through, I’ll be using DataFeedWatch as my feed tool of choice (personal preference), but it’s certainly possible to do the same within other feed tools (be it FeedOptimise, Shoptimised and more).
This guide is as detailed as possible, covering all areas where setup and attention are required, in order to dispel any possible confusion (after many self-induced headaches).
What are local inventory ads?
Lifting what Google state in their documentation, Google defines local inventory ads as the following:
“The local inventory ads feature allows you to showcase your products and shop information to nearby shoppers searching with Google. When shoppers click an ad that shows your local product they arrive on your local shop front, a Google-hosted page for your shop or your omnichannel landing page if your website meets the necessary requirements. Shoppers use the local shop front to view in-store inventory, see shop opening hours, get directions to your shops and more.”
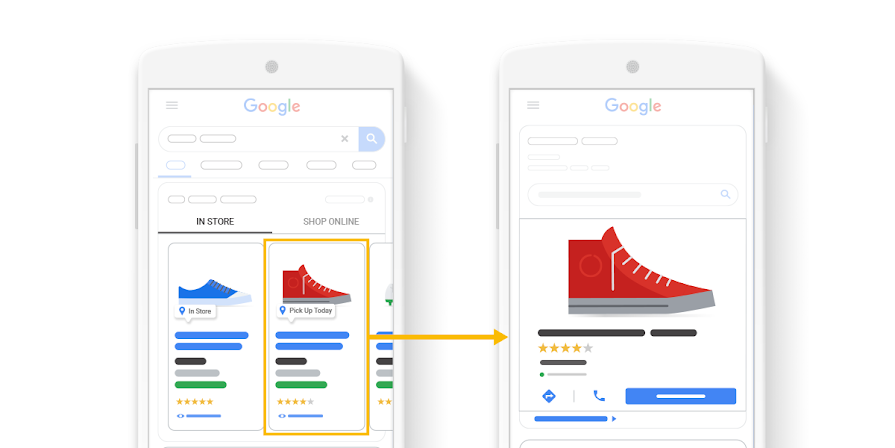
Put simply, this is another facet of reaching your customers - particularly when they’re within range of your physical retail locations. The list of regions where this is currently possible includes Australia, Austria, Brazil, Canada, Denmark, France, Germany, India, Ireland, Italy, Japan, Netherlands, New Zealand, Norway, Poland, Spain, Sweden, Switzerland, the UK and the US.
What to expect once this is set up?
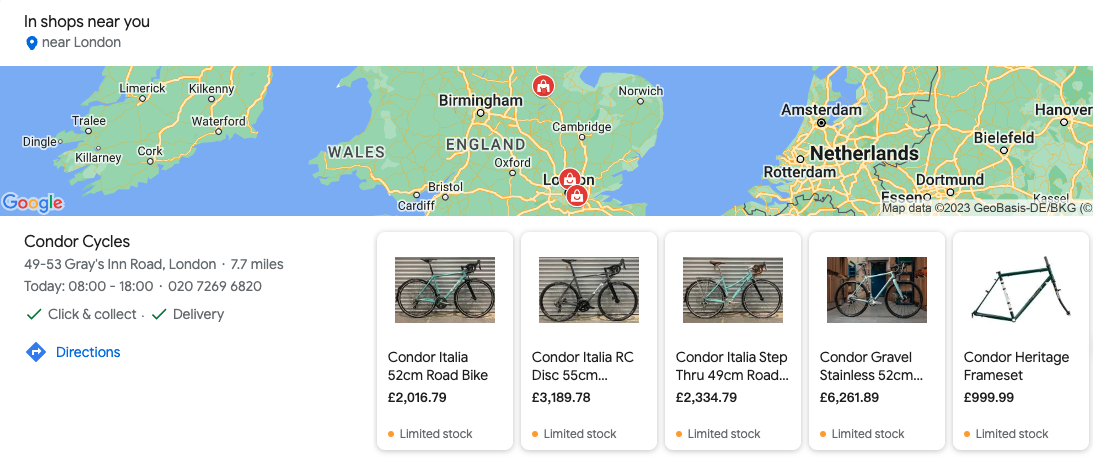
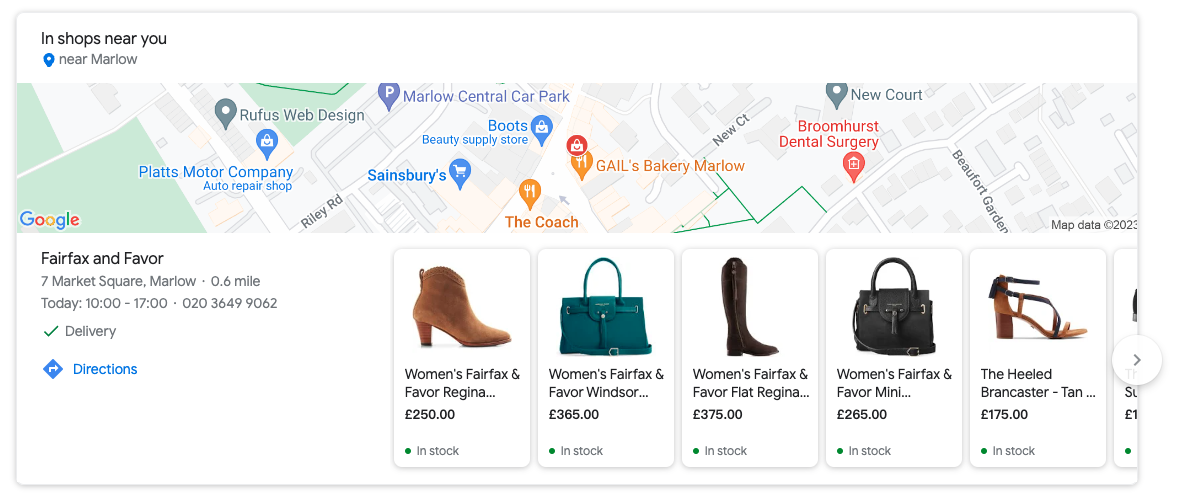
Depending on the deployment of local inventory ads you go with (merchant hosted or Google hosted storefront) you’ll be able to discern if a product is available in-store via Google Shopping. See the examples below which display some of the functionality that will be unlocked by the end of this how-to guide.
What you’ll need before you get started
- A feed tool that supports the format for local inventory feeds and local product feeds
- Admin access to Google Merchant Centre (GMC)
- Admin access to Google MyBusiness
- Read access to product inventory values (whether this resides in Shopify via a POS location or a hosted feed)
- Admin access to Google Ads (to connect GMC to Google Ads)
How to configure Google Merchant Center and Google MyBusiness
Once you’ve got access to all of the above, the first thing you’ll need to do within your Google Merchant Center, assuming this is all set up and already exists, is navigate to the ‘Growth’ button (in the side nav) and then ‘Manage Programs’.
For free local ads to work, you’ll also need to set up local inventory ads - so this will mean configuring both (the set up is almost the same thing across the two - you’ll just have a few more questions to answer when configuring).
Once you hit set up on a given plan, you’ll need to populate business information (this is contact details and business-location information), followed by connecting additional business profiles. For this section, it’ll require you to link your configured Google MyBusiness account and locations.
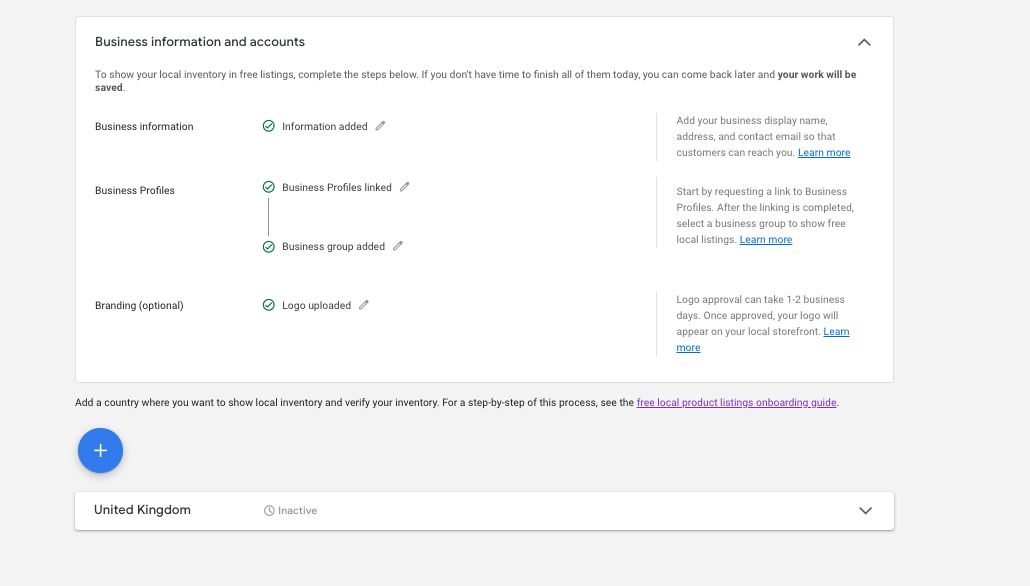
An additional option is to configure branding options - I’d recommend doing this (it’ll be a case of adding a logo and brand colours). For local ads, you’ll see an additional option to connect your Google Ads account (this linking process is similar to how you’d link your MyBusiness account and can be completed in a few quick clicks).
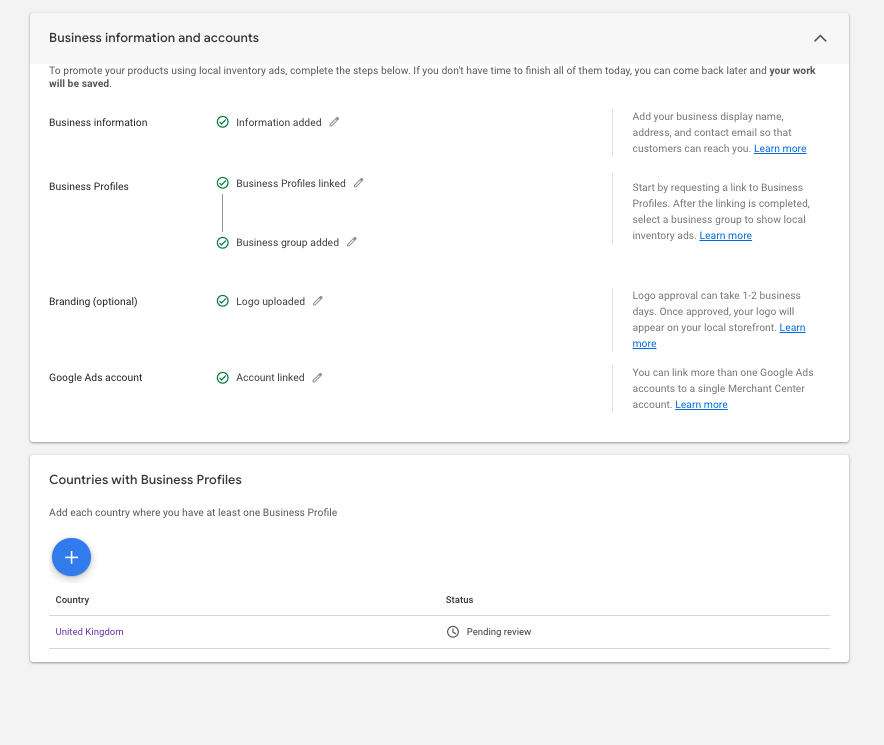
Once these prerequisite steps have been completed, you’ll now need to configure your countries and regions depending on where your physical stores and retail locations are geographically.
When configuring this, you’ll have three options (these all depend on your site and functionality available for how multiple channels are handled). If you have store inventory lookup available on-site, this will enable you to use the merchant hosted storefronts full and basic functionality. In our example, we’ll be using the Google hosted local storefront as click and collect is not available.
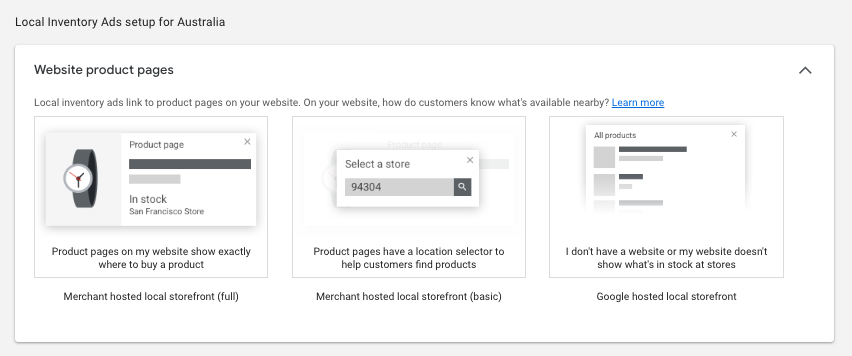
For reference, the merchant hosted local storefront enables merchants to offer a more bespoke and on-brand catalogue offering for local inventory.
If you do have the functionality to click and collect on-site and view inventory nearby I’d definitely recommend utilising the Merchant hosted storefront option to provide a better customer experience.
What you need to know about product feeds
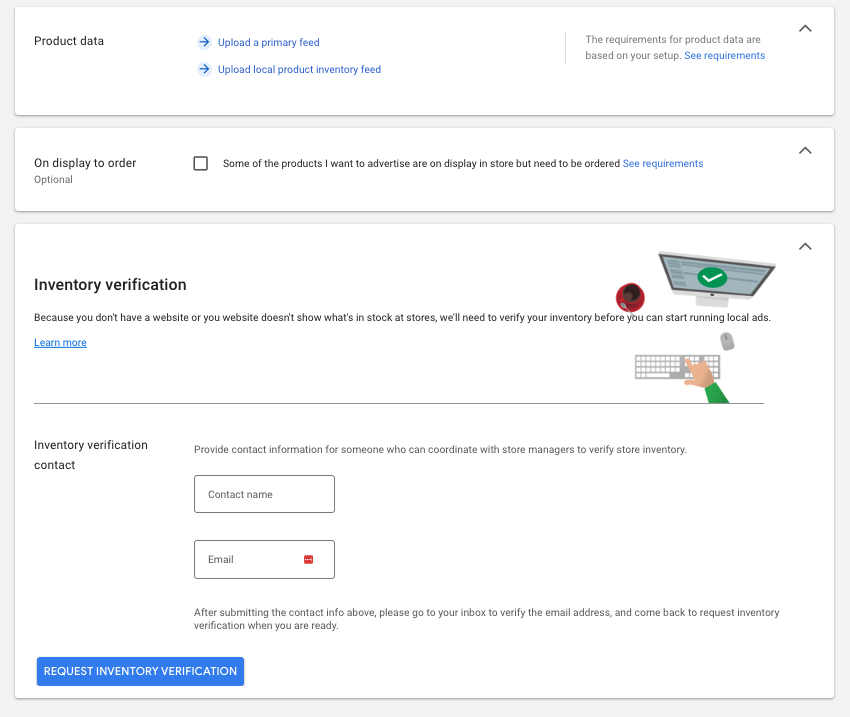
Assuming you have selected an option from the above list, you are now clear to get started with configuring your product feeds. As alluded to earlier in this how-to, you’ll require two feeds: a primary feed and a local product inventory feed. The primary feed is similar to your typical product feed for Google Shopping (we’ll touch on this later), your local product feed contains location information and an up-to-date stock quantity for each store location.
Something to consider here is that one product primary feed is absolutely fine if you have multiple stores - however, if you have multiple locations, you will require a local product inventory feed for each store (unless your feed tool allows you to have multiple iterations of the same product per row.
What this means is that you’ll need to have a version of each product for each store with its respective inventory value assigned to that product. I’d recommend having separate feeds so that it’s easier to manage product exclusions - though the initial setup time may take a little longer.
Once all of the above has been completed you’ll need to request inventory verification. You’ll receive an email once this has been selected. From this point, Google will get in touch with you and will require the team in-store to verify that the inventory in the feed is available in-store. This will require the team to photograph and validate that a set of items are available. Once this has been completed and verified by Google, you’ll be live and you’ll see some very satisfying green ticks in your merchant centre (see below).

Creating the required two feeds
As mentioned, I’ll be using DataFeedWatch for the creation of feeds side: for context this is a relatively inexpensive tool that is compatible with multiple platforms (Magento, Shopify etc..) and allows merchants to create csv, xml, txt (and more) feeds to use across a number of channels (Pinterest, Facebook, Snapchat, Google etc.).
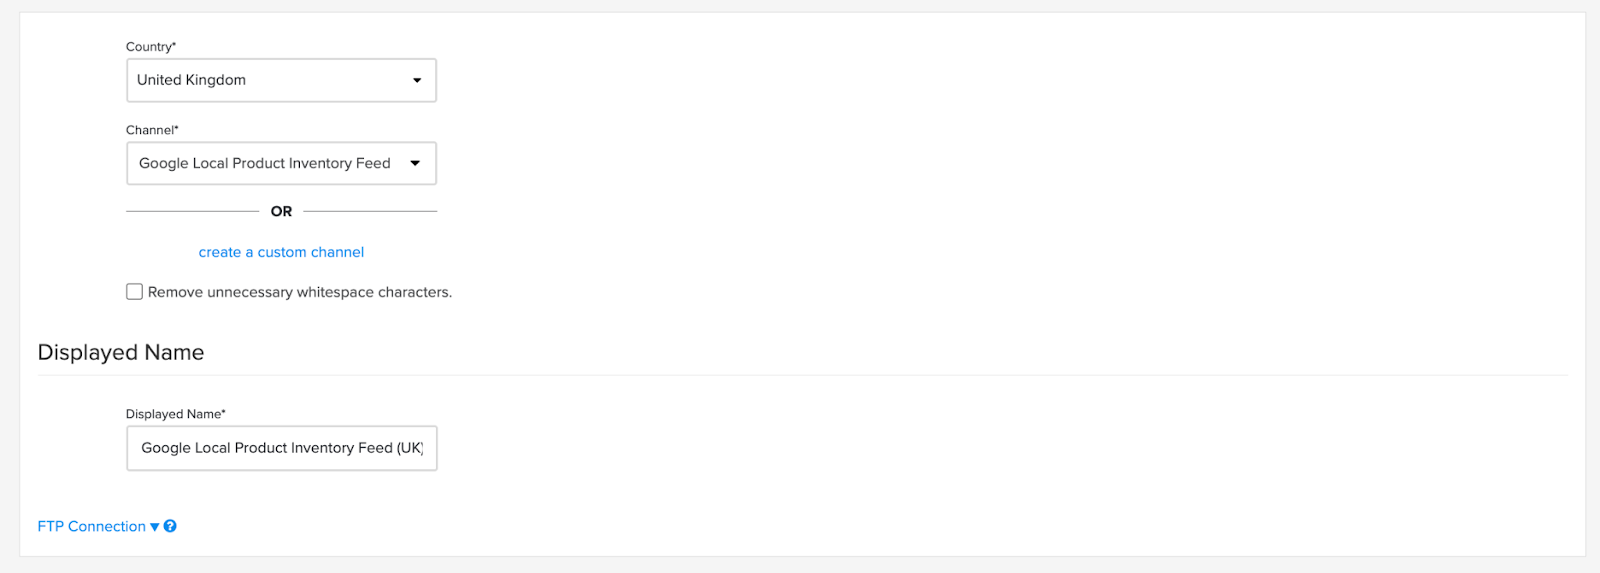
Permitting you have locations for each store connected to your Shopify instance and feed tool, you’ll be able to get set up quickly. Within DataFeedWatch, you can create a new channel for your given store and use the ‘Google Local Product Inventory feed’ format. This will automatically provide the prerequisite fields for building out a feed.
Local inventory feed
Within your local inventory feed you’ll need to set up the following fields - in parallel with each field I’ve also added an example value to provide some guidance here. This may vary depending on the products you’re selling.
Store code (e.g. 2) - your store code can be accessed in Google MyBusiness via ‘locations’ (this is a static value). You can assign a store code within Google MyBusiness for each location and more information on this can be found here (it is key these values match).
ID - typically I map this to SKU as this value is predominantly used in-store and in physical locations. This value needs to match the ID in your product feed also (this is why I’d recommend using a separate feed to your standard Google Shopping feed).
Quantity - this value should be the location inventory value - e.g. ‘quantity_london_store’ based on your connected store location. If this data doesn’t live in your platform (e.g. Shopify) you can use a lookup table and extract value from a live spreadsheet or FTP feed in Datafeedwatch.
Price - this should be the price you have for an item in-store (consider that if it’s on sale to use the sale price so that this is accurate and up to date).
Sale price - this should be your price in Shopify if a compare_at_price exists.
Availability - typically for this field I’ll assign a static value of ‘in stock’. The reason being is that I would exclude any products with less than or equal to two available. Google marks any items with less than three available as out-of-stock, likely due to lag-time between feeds updating. Otherwise use in-stock only IF quantity is greater than or equal to three. Both methods work.
Once you save and process the feed you’ll be given an output link, you can now plug this into Google Merchant Center.
If you have multiple stores, you will need to repeat the steps above for each location. You can clone this configuration but the only fields and variables that you’ll need to update are:
- Store code - this should reflect the other store (see note above on managing physical store codes in Google MyBusiness)
- Quantity - this should reflect the other store location to pull in the correct inventory quantity
Local product data feed
Now that your inventory feed is configured, we can set up the product data feed. This will house all information for a product that will be displayed within Google Shopping for your local inventory ads. Within DataFeedWatch, and similar to the above with the local inventory feeds, you’ll need to select the ‘Google local products’ format for the product feed. For some reason this is restricted by country but it’s fine to select ‘United States’ and this channel type for ease and convenience.
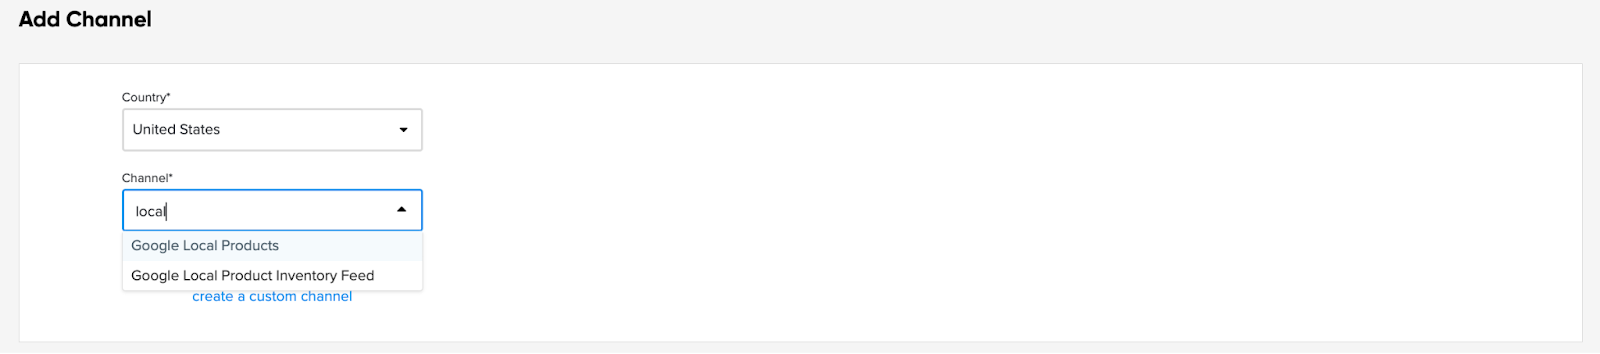
Once this is done, you’ll be able to see the feed configuration view. The prerequisite fields I have set up are listed below with some example values and context. My recommendation is to pull as much data in as possible here, just to ensure that the feed is as rich as possible and leaves no gaps - more so for optimal product discovery in search engines.
- ID - similar to the above with the inventory feed, I’d recommend using SKU here also to ensure unity across all feeds and channels.
- Title - this should leverage your product titles from your eCommerce platform
- Webitemid (optional field) - this is used as a unique product identifier. I’d recommend using ‘SKU’ here so that this matches IDs across all feeds
- GTIN (Barcode) (optional field) - this is your 13 digit barcode (EAN/GTIN). This is helpful for identifying if a product exists. If you don’t have a barcode, it’s key to ensure you have Brand or MPN available.
- MPN (optional field) - typically this is a SKU value also, however if you also have MPNs this can be added here (manufacturer part number).
- Brand (optional field) - this is typically a static value unless you’re a multi-brand retailer. This would need to be leveraged from the platform if so.
- Condition (optional field) - if all products are new then a static value would suffice here - e.g. new. If conditions vary, then this will need to leverage data from your platform based on some logic. E.g. tag or populate a metafield with ‘used condition’.
- Description (optional field) - for Shopify merchants this is your Body_HTML or product description but very typically a ‘description’ in most platforms.
- Product_type (optional field) - this can be mapped from your platform e.g. Product_type = T-shirt
- Link (optional field) - this field is key to get set up correctly to ensure products are mapped to the right variant. If you’re using product variants in Shopify, then ensure this maps to the correct URL. E.g. store.com/products/product1?variant=xyz
- Image_link (optional field) - this is your primary image for a product.
- Additional_images (optional field) - this field will pull the full image library for a product into the feed. This should be a comma separated list (e.g. imagelink1,imagelink2 etc) - make sure you exclude the first image as this is accessible via ‘Image_link’.
- Availability (optional field) - as mentioned in the local inventory feed guideline, you can use ‘in stock’ as a static value. If you have multiple stores I would avoid excluding any products as exclusions may vary across stores. This feed should house all products so ideally this value is dynamic based upon total quantity, e.g. if inventory is available in London OR Paris then ‘in stock’.
- Age_group (optional field) - this is just some additional information to populate. This can either be pulled from your platform depending on how data-rich your product catalog is: or you can assign a static value e.g. Kids
- Size (optional field) - this is more for fashion brands but if possible you can leverage your size option values.
- Size_system (optional field) - this is used to clearly label what sizing is being used (e.g. EU/US/JP etc) - this is typically a static value
- Price (optional field) - this will pull pricing from your eCommerce platform and, as mentioned above, do consider if a product is on sale.
- Sale_price (optional field) - this would be your Shopify price if the compare_at_price exists.
- Material (optional field) - this is an optional field but if possible you can pull this value from your eCommerce platform. This may be a tag or metafield value.
Plugging your feeds into Merchant Center
Permitting all of the above steps have been completed in terms of creating feeds, you can now plug both feeds into Google Merchant Center. To start with, your product feed will be classified as a Primary feed so you can go ahead and create a new primary feed.
You can now select your target country (ensure this is eligible for local ads) followed by a language and feed label. Following this, you can select the eligible programs and destinations for this feed. In our case, it’ll be for local inventory ads. One thing to look out for here is to ensure that any other primary feeds do not have local inventory ads enabled. You’ll want to separate these out to avoid conflict.
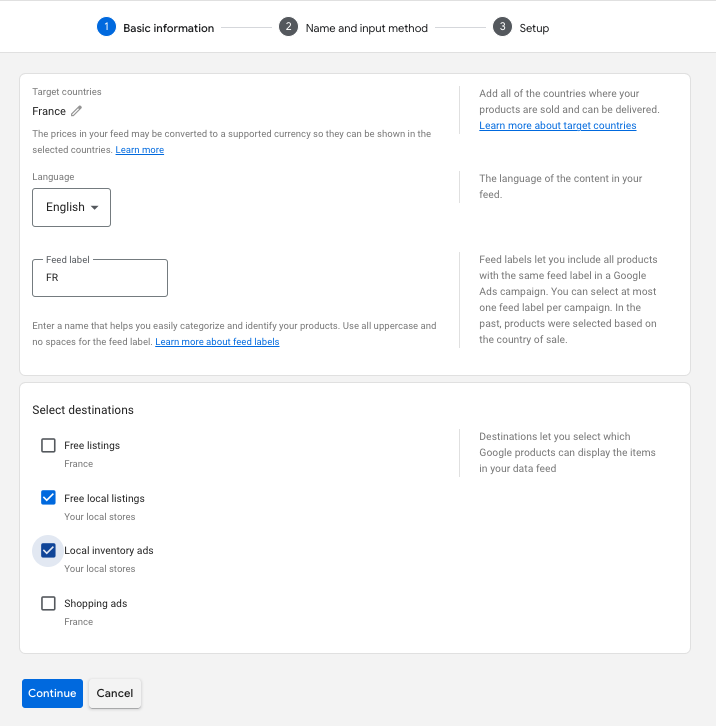
Following this, you can select ‘file’ as an input method and subsequently plug in your feed URL. You can then apply the local currency to the feed, depending on your location - this will help avoid any potential errors in the feed or GMC.
Next, you’ll need to add your ‘supplemental product inventory feed’. This is similar to the above steps except for the type you’ll need to change to ‘local inventory’ as opposed to regional. You can then plug in your local inventory feed link and this will fetch from your local feed platform. Again, if you need to configure a currency you can do so at this point.
Now this is all connected to your merchant center, you can go back to Google Merchant Center and request feed verification. It’s possible that you may see some errors first time around and will need to troubleshoot. Typically this may be IDs mismatching and I’d recommend leaving this for 48-72 hours as this usually corrects itself and is a false-negative. If this persists then definitely review your feeds and ensure that there is parity between IDs (this is typically the main issue I have encountered).
Once all of the above steps have been completed, and verification by Google has been approved this will be all. You can monitor how this is performing via ‘Performance’ in your Google Merchant Center dashboard - this will provide insight into click through rate, impressions and more.
Final thoughts
If you need any support with your ecommerce setup, do get in touch.
Subscribe to our newsletter
Our monthly newsletter is designed to be the most actionable and inspiring eCommerce newsletter in existence, combining examples of eCommerce innovation, benchmarking insights from the industry, and the latest news and eCommerce trends.
By signing up you are agreeing to our privacy policy.